
NBI Clearance for Abroad 2026 Requirements and Processing Time
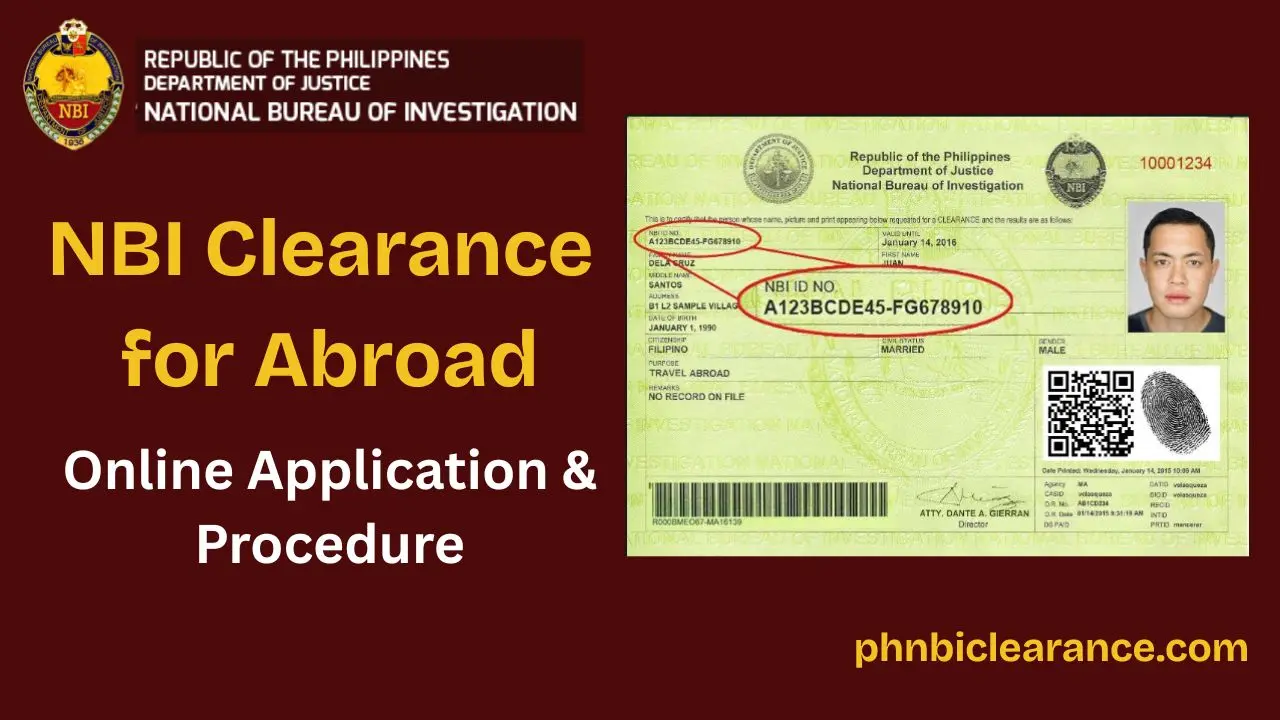
NBI Clearance for Abroad is a document issued by the National Bureau of Investigation confirming that a person has no criminal record. It is required for work, immigration, and long-term visas abroad. If you are planning to work, study, or migrate abroad, you may be required to submit an NBI Clearance for Abroad as part of your visa application.
Requirements for NBI Clearance for Abroad
In order to apply for NBI Clearance for Abroad, you must have the required documents. Before you begin the application process, make sure you have the following documents ready:
- Two Valid Government IDs
- Completed Clearance Application Form [Online]
- Reference Number
- Fee Payment Receipt
- Biometric Data Registration [Fingerprint Form No.5]
- NBI Appointment at NBI Office
- Additional Documents e.g. Letter of Invitation from Foreign Company/School/University [If Requested by NBI]
- Old NBI Clearance [If Applying for Renewal]
Accepted Valid IDs for NBI Clearance
You must present two valid government-issued IDs from the following list:
- UMID (SSS and GSIS)
- Passport
- PhilHealth ID Card
- Voter’s ID or Certification Of Registration
- BIR TIN
- PRC License
- LTO Driver’s License
- Pag-IBIG ID (Not Loyalty Card)
- Postal ID
- Birth Certificate Authenticated by PSA/NSO
- Certification from Malacanang in Connection with Indigenious Groups, Tribal Membership, Foundling (1) Solo Parent ID
- PNP Clearance Issued By The Police Station where Applicant is a resident of the Station’s Jurisdiction
- Seaman’s Book
- School ID Together With Current Registration Card
- Senior Citizen’s ID
- P.W.D. ID
- Marina ID
- Security License ID (for Security Guards)
Always bring the ORIGINAL copies of your IDs — not photocopies. Also ensure that your full name is spelled consistently and identically across all your documents. Any discrepancy may cause delays or denial of your clearance.
How to Get NBI Clearance for Abroad (Step-by-Step)
The NBI Clearance for Abroad Application Process is available online. It is a simple process if you have all the required documents.
Step 1: NBI Online Registration
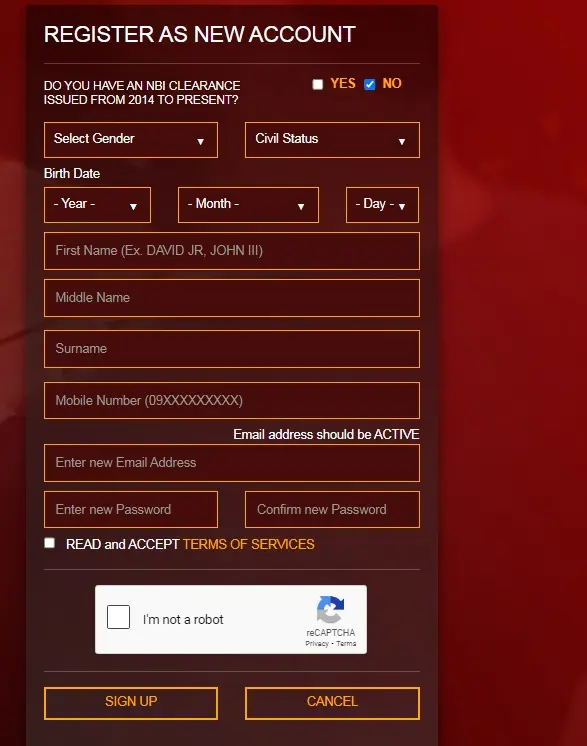
Visit the official NBI Clearance website at clearance.nbi.gov.ph. First-time users must complete online registration before proceeding with the application.
Select “NO” when asked “Do you have an NBI Clearance issued from 2014 to present?” then fill out the registration form. You will need to verify your email address or mobile number using a One-Time Password (OTP) to complete registration.
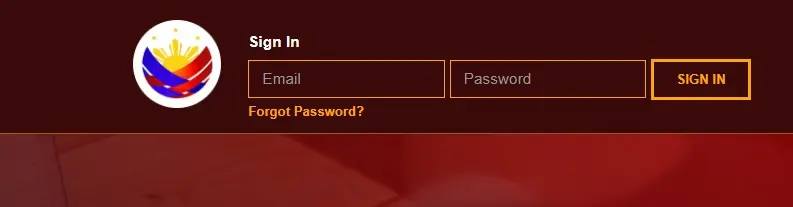
Step 2: Log In and Apply for Clearance
Once registered (or if you already have an existing account), log in at clearance.nbi.gov.ph using your registered email and password.
Thereafter click on Application and fill up the clearance form with your personal information. Click on Save Information button. Finally, click on Apply for Clearance to proceed.
Step 3: Select “Travel Abroad” as Your Clearance Purpose
Choose “Travel Abroad” as your clearance purpose. If you also need the clearance for other purposes locally, select “Multi-purpose” instead, which is valid for both local and international use.
Step 4: Provide Two Valid Government IDs
Provide the details of your two government-issued IDs. Make sure both are valid and included on the NBI-accepted list above.
Step 5: Select NBI Branch and Set NBI Appointment Date & Time
Select your preferred NBI Branch and choose your appointment date and time slot. Review your selection carefully before submitting.
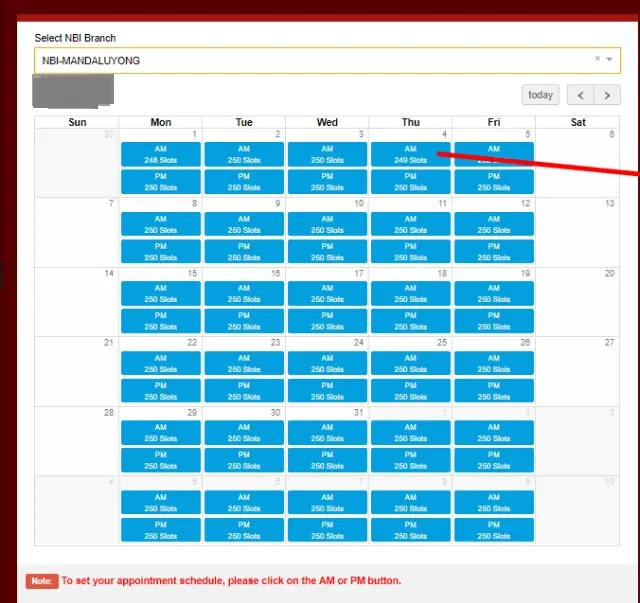
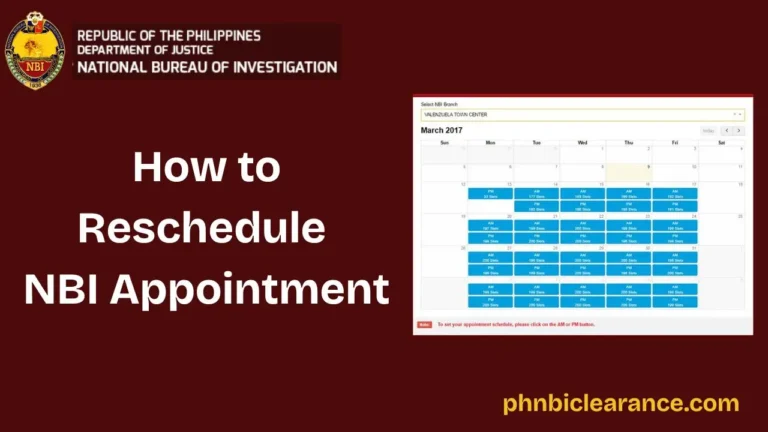
No Rescheduling Allowed. Once you confirm your NBI appointment date and time, you CANNOT reschedule or change it. Choose your appointment slot carefully. If you miss your appointment, you will need to start the process again.
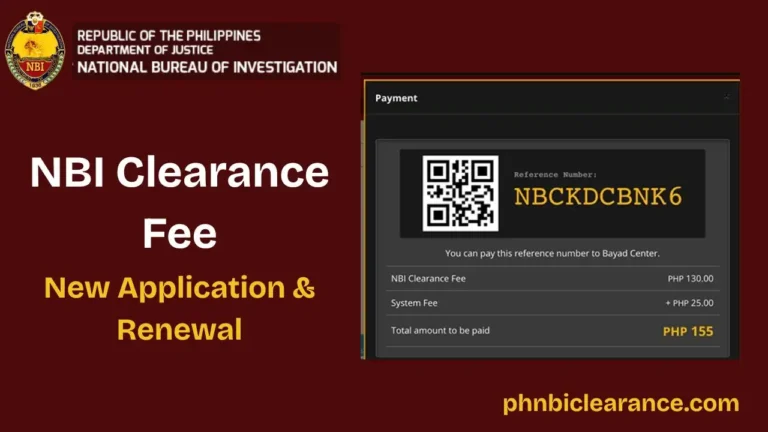
Step 6: Save Reference Number and Pay NBI Clearance Fee
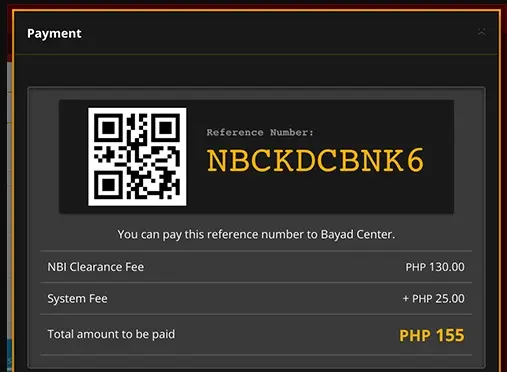
Save your Application Reference Number. Then select your preferred payment method and pay the total NBI Clearance fee of ₱155. Keep your payment receipt as proof. Your NBI appointment is confirmed once payment is completed.
Step 7: Visit the NBI Office on Your Appointment Date
As per your selected date & time, you should visit concerned NBI Branch Office to attend your NBI Appointment. Please carry two valid IDs, Reference Number, Payment Receipt and other required documents to the NBI Office.
Visit the NBI Office 10 minutes before your appointment time. Get help of an NBI service employee to understand the NBI Appointment Process.
Step 8: Biometric Registration (Fingerprint, Signature & Photo)
During NBI Appointment, you are required to fill up and submit Form No.5 for fingerprint/biometric data registration. You should also register your signature and get your live photo captured. Do not wear contact lenses of an unusual color on this day, as your photo will be taken.
Step 9: Document Verification and Collect NBI Clearance
The NBI staff will carefully verify your government IDs and check your background based on your personal information and biometric data. If the NBI requests additional documents (e.g., a letter of invitation from a foreign employer, school, or university), present these as required.
Once the process is complete, the staff may ask you to wait 10–15 minutes or return the next day to collect your NBI Clearance Certificate for Travel Abroad. Follow their instructions.
What Happens if You Get a ‘HIT’?
If your name matches a record in the NBI database, your clearance will be tagged as a ‘HIT’ and will not be immediately released. This does not necessarily mean you have a criminal record, it may simply be a name match with another person on file.
Here is what you should do if you get a HIT
- Wait for the NBI to contact you. The HIT will be forwarded to the appropriate NBI unit for further investigation and verification.
- You may be asked to return to the NBI Office on a specified date for further processing.
- Bring additional documents if required, such as a valid ID, birth certificate, or any other supporting documents the NBI may request.
- If it is confirmed that you have no criminal case, your NBI Clearance will be issued. If there is a case, further legal procedures will apply.
A HIT case can take a few days to several weeks to resolve. This is another strong reason why you should apply for your NBI Clearance at least one month before your target travel or visa application date.
NBI Clearance for Abroad Fees
The NBI Authority takes nominal fee for issuance of NBI Clearance to the citizen/resident. When you apply for NBI Clearance online, you need to pay the clearance fee plus service fee as per rules.
- NBI Clearance Fee: ₱ 130
- NBI Service Fee: ₱ 25
- Total NBI Fee: ₱ 155
NBI Clearance for Abroad Validity
The NBI Clearance for Abroad comes with a validity of one year from the date of issuance. So, your NBI Clearance for Travel Abroad is valid for one year, thereafter you need to apply for NBI Clearance for Abroad Renewal, if needed.
If your NBI Clearance has expired and you need a new one, the renewal process is the same as the original application. Simply return to clearance.nbi.gov.ph, log in to your account, and follow the same application steps. Make sure to bring your old NBI Clearance when you attend your appointment.
Countries that Require NBI Clearance for Abroad
The NBI Clearance for Abroad is required when you want to travel to a foreign country and stay there for work, study or other purposes. Here I am going to share the list of countries that required NBI Clearance from Filipino Citizens to enter the country.
| Region/Country Name | NBI Clearance Needed for |
| Middle East Countries | |
| United Arab Emirates (UAE) | for employment, residency |
| Saudi Arabia | for employment, residency |
| Qatar | for employment, residency |
| Kuwait | for employment, residency |
| Oman | for employment, residency |
| Bahrain | for employment, residency |
| Jordan | for employment, residency |
| Lebanon | for employment, residency |
| Israel | for employment, residency |
| Asian Countries | |
| Japan | for employment, long-term visas |
| South Korea | for employment, immigration |
| Taiwan | for employment, residency |
| Hong Kong | for employment, especially domestic workers |
| Singapore | for employment passes |
| Macau | for employment, residency |
| Malaysia | for employment |
| Brunei | for employment, residency |
| European Countries | |
| United Kingdom | for work visas and residency |
| Germany | for employment, residency |
| Italy | for residency, family reunification |
| France | for employment, residency |
| Spain | for residency |
| Norway | for employment, immigration |
| Netherlands | for residency, work visas |
| Belgium | for employment, residency |
| Denmark | for employment, immigration |
| North American Countries | |
| United States | for work or immigration purposes,especially in legal or medical fields |
| Canada | for immigration, work visas |
| Mexico | for residency, employment |
| Australia and Oceania | |
| Australia | for skilled workers, residency, immigration |
| New Zealand | for work visas, residency |
| African Countries | |
| South Africa | for employment, residency |
| Nigeria | for employment |
| Other Countries | |
| Brazil | for residency, work permits |
| Argentina | for work permits, residency |
| Chile | for work permits, residency |
Do You Need a DFA Apostille on Your NBI Clearance?
Depending on the destination country, you may be required to have your NBI Clearance authenticated or apostilled by the Department of Foreign Affairs (DFA) before it is accepted by a foreign authority.
Countries that are signatories to the Hague Convention (such as the United States, United Kingdom, European Union countries, Australia, and many others) require an Apostille an official seal from the DFA that verifies the authenticity of the document.
Special Note for OFWs
If you are an Overseas Filipino Worker (OFW) or planning to work abroad for the first time, note that the NBI Clearance is just one of several documents you may need. Other government requirements may include:
- POEA (Philippine Overseas Employment Administration) clearance and Overseas Employment Certificate (OEC)
- OWWA (Overseas Workers Welfare Administration) membership and documentation
- Medical examination from an accredited clinic
- Pre-departure Orientation Seminar (PDOS) certificate
Check with your recruitment agency or the POEA for the complete list of documents required for your specific destination country and job category.
Common Mistakes to Avoid
Here are some important tips to make your NBI Clearance application smooth and trouble-free:
Before Your Application
- Apply at least one month before your intended travel date or visa application deadline. Processing can sometimes take longer than expected, especially if there is a HIT.
- Double-check that the name spelling on all your documents is exactly the same. Any discrepancy between your IDs and your application form can cause delays.
- Make sure both of your government IDs are still valid — expired IDs are not accepted.
On the Day of Your Appointment
- Bring original IDs — photocopies alone are not sufficient.
- Arrive at the NBI Office at least 10 minutes before your scheduled appointment time.
- Keep your Reference Number and Payment Receipt accessible — you will need them at the NBI Office.
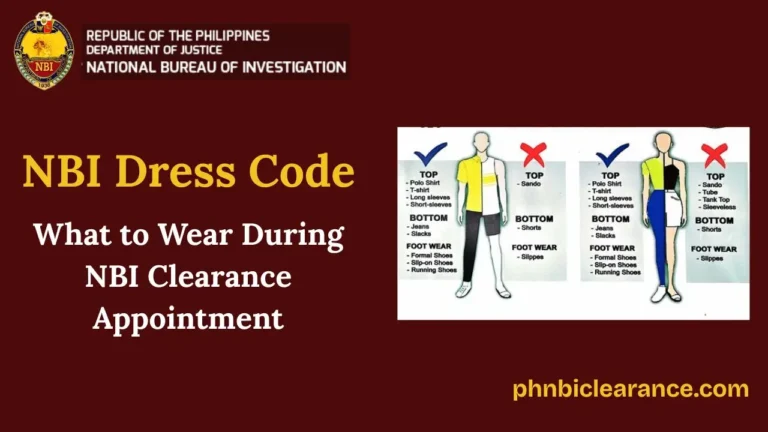
- Dress appropriately for your photo capture. Avoid wearing uniforms or clothing that may resemble official uniforms.
After Receiving Your Clearance
- Check your NBI Clearance immediately upon receipt. Ensure your name, date of birth, and other details are correct.
- Keep your NBI Clearance in a safe place and make a photocopy or scan for your records.
- If your destination country requires an apostille, proceed to the DFA for apostillation right away.
- Remember that your NBI Clearance is valid for one year only. Plan renewals accordingly if you need it again.
Final Words
The NBI Clearance for Abroad is an essential document for every Filipino planning to work, study, immigrate, or reside in a foreign country. While the process is straightforward, proper preparation is key to avoiding unnecessary delays.
Start your application early, ensure all your documents are complete and consistent, and follow the steps outlined in this guide. If you have specific concerns about the apostille requirement or country-specific rules, always confirm directly with the relevant embassy or consulate.
One Comment